HOW TO: Shooting the milky way in a big city with the Olympus OM-D E-M5
by Simon Helms – See his INSTAGRAM Here!
I always have been interested in technology and the appearance of things, so I thought photography would make a great hobby for me. And as a student I even might have been able to barely afford a camera, but the risk of not discovering my passion for it discouraged me. When my father passed his beloved Olympus O-MD E-M5 on to me last year and I graduated from school, I discovered a passion that doesn’t let me sleep at times nowadays.
Once I read a User Report (http://www.stevehuffphoto.com/2014/01/24/olympus-om-d-e-m5-for-landscape-astrophotography-by-jensen-chan/) by Jensen Chan on Steve’s website that coped with the E-M5 and its astrophotography capabilities and it amazed me in every way. Instantly I got an old tripod out of the basement and tried to shoot the stars and the milky way at the place where I lived that time, a small village in northern Germany (the light pollution there is quite high though, its near Hamburg). Even though I had little Lightroom knowledge, I was quickly impressed what could be achieved as a beginner, and even quicker I fell in love with the idea what I could achieve with more knowing-how. In this report I want to show you what I learned, and what’s more important, what can be done facing bad conditions of light pollution (I live and shoot in a German city with more than 100.000 inhabitants nowadays, all the images in this report are from there) and what can be done with a camera that is not ideal for low light.
Don’t get me wrong. I love the E-M5. It’s handiness, it’s image quality, it’s RAW data. But when it comes to high ISOs, it’s difficult to cope with all that sensor noise. To get the best out of my exposures I use a very fast lens, the SLR Magic 12mm T1.6. An alternative would of course be the Olympus 12mm f2.0, but I chose the SLR due to price reasons. And because the SLR is only usable with T2.0 (which equates f1.8) and slower (faster than T2.0 you get horrible lens flares), the two should be comparable in terms of light incidence. While Jensen had the opportunity to shoot in least light polluted places, I want to present my experiences of shooting in a big city.
The settings that I would normally use for milky way exposure might be 20s, f1.8, ISO 1600. Preconditions are obvious: new moon or at least not visible moon and an absolutely dark, clear night sky. But beside the fact that in cities you wouldn’t get far with that exposure, you would already have some serious noise issues at ISO 1600. One way to handle that would be stacking exposures which I tried, but that eliminates the possibility of shooting panoramas, and with 12mm on Micro Four Thirds there is a serious restriction of what you can get on your image. So I decided to use another method: ETTR, long: Expose To The Right. The name refers to the histogram of our image, where the aim is to push the distribution as much to the right (the lights side) as possible, without clipping of course. The idea is to collect all the information our sensor can get under difficult conditions by dramatically overexposing our shot. We get a lot more information and in times of Lightroom and Photoshop it isn’t that hard to correct the exposure afterwards. But, and what follows now, will first sound like evil tidings for E-M5 users, we will need very high ISOs. In dimensions like 6400 or even 12800. The clue is physical: Due to the high signal-to-noise ratio (your image will get extremely bright) noise won’t play the same role as in a darker exposure with the same ISO. I don’t want to tell fairy tales, of course our image will have a lot of noise. But it will be what I would call acceptable if we consider effective ways of getting rid of a lot of that noise. And because the landscape we want to shoot under the sky doesn’t run away, we make a separate shot of it, with low ISO and much longer exposure time. Later in post we’ll put the two exposures together with layer masks. That’s all I want to tell for shooting, since in my eyes the 95% of landscape astrophotography is post processing.
In Lightroom all we want to do is some general adjustments. If we shot panorama, we stitch the single sky exposures together using the simple Lightroom feature. Then we lower the exposure and adjust the tone curve with the aim to bring out the milky way a little more. Maybe the white balance must be corrected too. In general I wouldn’t do too much in Lightroom, because the major part is easier to do with layers in Photoshop. Nearly the same procedure goes for the landscape exposure(s), but often I aim for finishing them in Lightroom as it’s not that important to get every pixel out of them. Alternatively we can do these basics in Camera Raw in Photoshop.
In the next step we import the sky file into Photoshop and cut out the landscape part that might be left in it. After inverting the selection we can put adjustment layers like curves on it. Now follows the most important technique in my editing process: using channels. Of course we don’t want curves, levels or hue/saturation layers to effect the whole image, so we have to go to „Channels“ to make appropriate selections for the areas we want to effect. This is perfect for astrophotography, since channels differentiate between different degrees of brightness and we have a lot of them in dark skies filled with stars. We look at the different red, green and blue channels and drag “RGB“ onto the little dashed circle in the bottom right corner. By doing this we select only the brighter 50% of our image. An easy way to recognize this is looking at the histogram. Then we click on the little „Save selection as channel“ symbol in the bottom right corner. Now we hold Shift + Alt + Cmd/Ctrl and click on the new channel. What this does is shifting the distribution of the histogram even more to the right and selecting even brighter areas. Now again we save the selection as a new channel. This procedure of shifting the lights to the right and creating a new channel can be repeated until we have a few new channels with different brightness levels in them. By inverting the selections we can create new channels with only the darkest areas selected in them. Why did we do this? Because now we can mark a channel, click on the little „load channel as a selection“ button in the bottom right corner and use them as a layer mask for layers like curves, levels or hue/saturation by going back to the layers tab and clicking on „create layer mask“.
In conclusion: With channels we can create layer masks for our adjustment layers to only effect certain bright or dark areas. Now we use adjustment layers to push the brightness of the milky way up, the brightness of the deep sky down and give everything the color we want.
But still we are facing a lot of noise. Noise reduction is always to be done as the last step of image processing. If we are finished with all contrast and color corrections, we press Shift + Alt + Cmd/Ctrl + E to create a new layer that contains all the previous. Now we apply a noise reduction filter, I usually use Dfine2 or Topaz DeNoise. Be not too careful by setting the strength and have in mind that we have a method to make it only apply to the darkest areas of our image, where the noise still belongs to, but our stars don’t. That’s really the secret of intelligent noise reduction, we look on our channels and select the one that separates the stars from the noise. We create a layer mask and now our stars and the milky way don’t get affected by the blurring noise filter. To finish our editing we import the already edited landscape exposure and put it over the sky exposure.
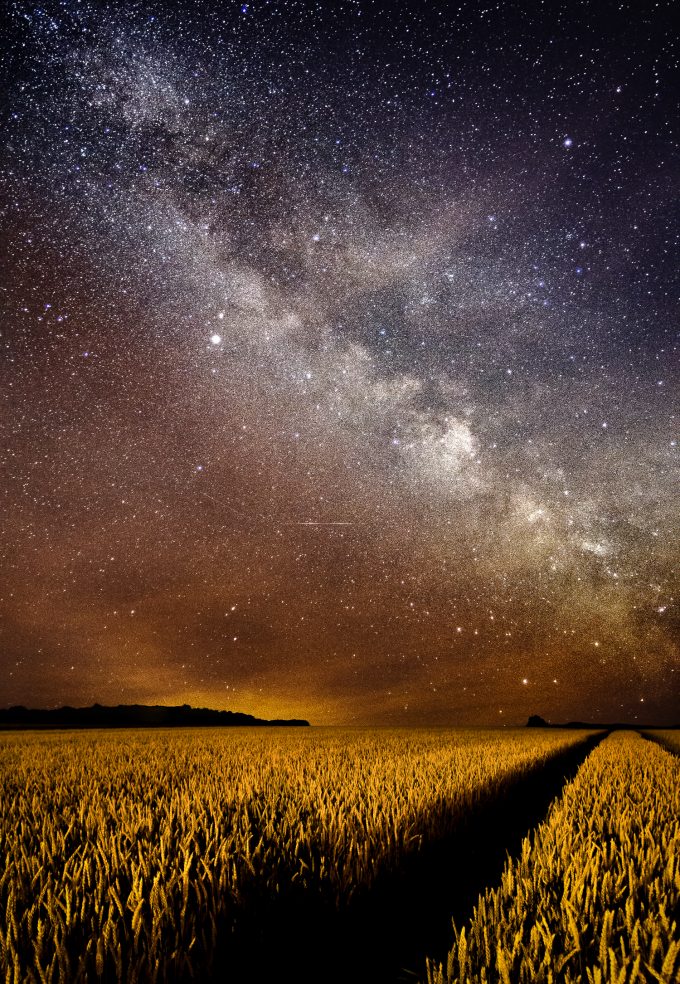
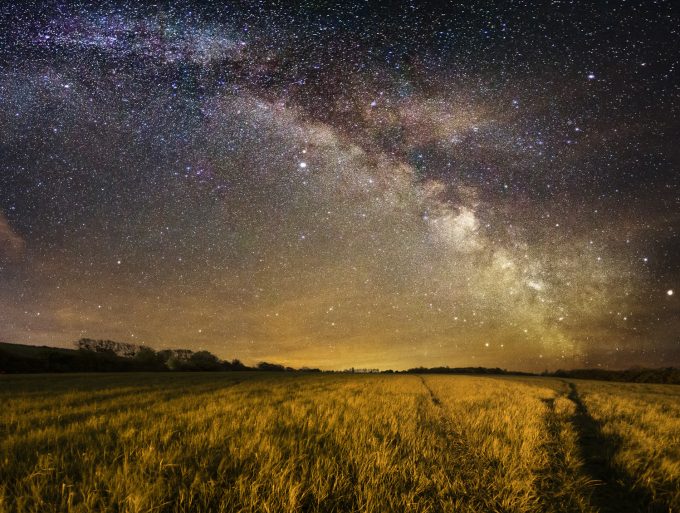
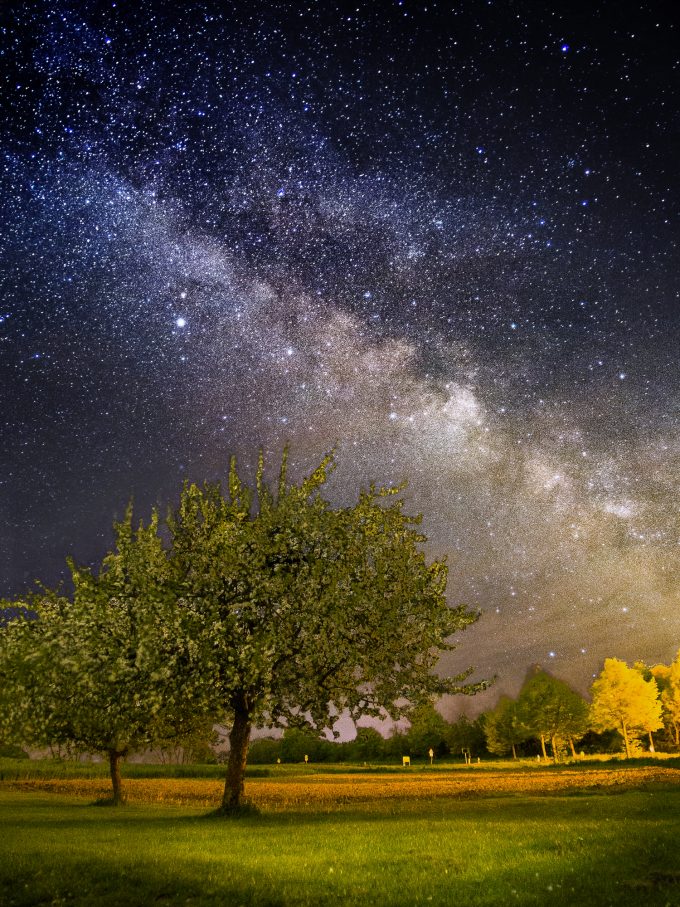
The results you can see in this user report were all shot in German city Goettingen that has a population of about 116.000 people. Of course there are much better and clearer milky way shots on the internet (the weakness of my method is indeed to get rid of noise directly on the milky way), but my aim was not to perfectly shoot the milky way, as that will never be possible in light polluted cities, it was to show that there is a lot more to achieve than many of us might think. And now imagine the results we can reach in really dark areas! And of course the outcomes may vary from city to city. I would always try to get far from the center and using light pollution maps. Maybe the next step for me will be getting the 12mm f2.0 by Olympus and a star tracker for my tripod to get even better photos.
It would be awesome if my report inspired or helped you and I would be very pleased about reading your opinion or any ideas for improving the results!


Hey I have an em5 myself and this sounds like an awesome way to really make milky way pictures worth it! I have 2 questions.
1) how do you manage to take panoramas with the em5 when you cant see the sky? Since you have to take individual pictures, how do you make sure the frame is perfectly aligned with the next picture and not overlapping or too high/low?
2) Not gonna lie, I understood almost nothing of what you described in the article. Ive never used photoshop and my lightroom skills are pretty limited. I cant really follow everything youre saying. What should I do?
Thanks in advance and I love the pictures!
Hey,
1) I set the ISO even higher to values like 20000 or so (so you can work with 1s shutter speed and don’t have to wait all the time) and take test photos to see what’s in the frame. Overlapping ist actually your aim, like the 2nd picture should still contain 2/3 of the first picture and so on.
2) To describe that now would definitely too much (in the article I really tried to shorten everything), but I recommend going to YouTube and watching basic Lightroom and Photoshop Tutorials, there are really great channels out there.
Thank you for your appreciation!
What do you think of the Olympus M.ZUIKO DIGITAL ED 12-40mm F2.8 PRO lens in regards to shooting the stars? The SLR Magic 12mm T1.6 is now selling for $1200.
Wow, thats definitely too much! Any lens with aperture 2.8 or faster will work but I would also keep an eye on the Olympus 12mm 2.0.
Isn’t there a firmware that tracks stars?
This kind of pictures used to be amazing. Now they are so common that the magic is gone. You just think ‘meh, another Milky Way over some boring landscape’.
Alex, Im curious if you’ve ever tried this? There is a whole experience with shooting the milky way, getting out in the middle of the night, watching the stars and satellites and meteor, listening to the wildlife.
You could say the same thing about any type of photo. Every black and white landscape in a national park shot I see, I think, whatevs…Ansel Adams already did that. Boring…
Hi David,
I’ve tried, yes, although I didn’t put much effort into it, and didn’t get a great result. I was still happy with it at the time 🙂
In my opinion, if the landscape itself isn’t that interesting, adding a Milky Way above it won’t help much. Yes, the Milky Way is spectacular, but you can find so many pictures of this kind on the Internet that it’s become… cliché. I get the same impression with long exposures of water: very pretty, but so trite.
To me, most Milky Way pictures and long exposures are just a display of well-learned techniques, and as such aren’t very interesting.
As for what you write (ironically) about Adams… Yes, I believe the vast majority of pictures are unoriginal, and I’d say also without meaning. It’s a bit sad, I know. Many photographers think they are ‘artists’, but I have to disagree with that; there is a huge difference between taking good, or even striking pictures, and being an artist.
But I’m going of the point…
These are amazing photos, Simon! Post processing is such a beautiful realm with endless number of ways of how a photo can end up looking, all depending on the editor’s vision and style.
What were your findings of using lower ISO (e.g. 800 or 640), and then bringing out the details in the stars in post processing (while keeping the noise at bay)? I can’t help but wonder how the two styles of processing will show when taking photos in an environment like yours. My first thought is that the lower ISO will catch fewer stars, but maaaaybe a little crisper.
Glad you liked the article, Simon. Do add me on Facebook =) Would love to exchange ideas and experiences.
Cheers,
Jensen
Thank you so much Jensen! I also tried using lower ISOs but found that it is extremely difficult to bring out the structure of the milky way (it is barely visible). But you are right, the overall look is a lot clearer. That’s why I think about getting a star tracker like the Vixen Polarie, so I could combine low ISOs with very long exposures.
Best regards,
Simon
Thanks for sharing 🙂 While I use the same approach (two separate exposures for sky/foreground), I really like the idea of brightness-related adjustments. I never really thought of doing it this way, but will give it a try for sure.
Also, I created a group on Flickr a while back “Mirrorless Milkyway in 4/3”. Feel free to check it out. Lots of good stuff on there.
https://www.flickr.com/groups/mirrorlessmilkyway/
Super nice your pic
How do you Ettr on the em5?
Hey Dave, on the E-M5 you can shoot an image and then (in the image preview) press the Info button once or twice to show the histogram of the image. Make sure the distribution is on the ride side without being cut by the right side of the histogram.
*right side of course
Thx. I’ll try that.
Thank you. The processing steps are very helpful.
Inspiring! Need to try this in Frankfurt :).
Thanks for sharing.
Great article and stunning images Simon, thanks for sharing. I bought my Sony RX1R2 with its 35mm f/2 lens for the primary purpose of shooting panos, though have yet to shoot any Astros with it… – Feeling inspired
I’ve just ordered a set of ND’s to shoot some extremely long exposure panos… have you any experience with this? I would enjoy hearing and Seeing if you have.
Thanks,
Cowboydoug
Shooting with ND’s is a thing that I’m planning since months but didn’t start yet. I love the outcomes, especially if there is water involved. Much fun!
Best regards,
Simon